Planter Care

4 Steps To Plant Your Planter

  • Step #1. Place planters on small risers or decorative risers to allow for proper drainage.
  • Step #2. Fill planters a minimum of 2/3 full, with clear gravel for drainage purposes.
  • Step #3. Filter cloth can be placed on top of the gravel to prevent soil from draining through the bottom drainage hole.
  • Step #4. Soil can then be put on top of the filter cloth and gravel, or for better results, have arrangement planted separately in a plastic container and place on top of filter cloth and gravel.

Variants of Planting

Winter Care

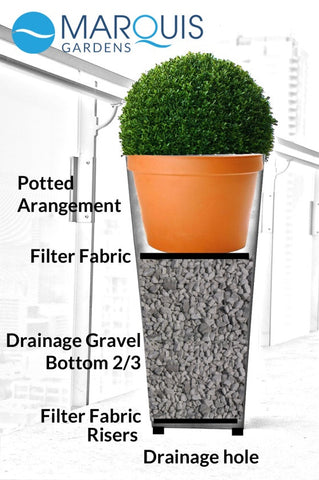
Remember: Trapped Water in Any Planter, Once Frozen, Will Expand and Cause Damage

Create Year-long Interest with planters! Your planters that were once blossoming and vibrant in the summer are now beginning to look spent as the cold weather sets in. If you are like us, you want your planters to be used year-round and are looking forward to decorating the planters for the winter season.

This can be done safely avoiding winter damage with the following tips:

  • Winter Arrangements. All planters, no matter their material, can remain planted or decorated for the winter months so long as they have proper drainage and are raised above the frost line.
  • Drainage. Your planter should have risers beneath them to ensure drainage hole does not freeze against the ground surface, as well as to remain above the frost line to prevent damage to the bottom of the planter. Planters should also be 2/3 full of ¾ or larger stone (used for drainage) to avoid a large amount of moist soil from freezing and expanding.
  • Salt & Chemicals. Ensure planters are kept clear from harsh salts and chemicals, as these may damage the stains and/or concrete.

Use a soft cloth and vinegar to wipe down the planters